Logging In to the Management Page
Log in to the management page where you can set the parameters of the Mobile WiFi.
Procedure
- Open a browser and enter 192.168.8.1 in the address bar.
- Enter the user name and password and click Log In.
Note:
- The default user name and password are both admin.
- If the Mobile WiFi displays a message indicating low password strength, use a stronger password. For details, see Changing the Password.
Status Icons
Using the status icons, you can discern the operating status of the Mobile WiFi .
The following table describes the icons displayed in the upper right corner of the Mobile WiFi user interface.
| Item | Status |
|---|---|
| SIM/USIM card |
Note:
|
| Internet |
|
| WLAN |
|
| Signal |
|
| Roaming |
|
| SMS |
|
| Update |
|
 : The SIM/USIM card is faulty; PIN/PUK is not verified.
 : Uploading data.
 : Downloading data.
 : Uploading and downloading data simultaneously.
 : A dial-up connection has been set up, but no data is being transmitted.
 : WLAN enabled.
 : WLAN disabled.


 : These icons indicate the signal strength from weak to strong.
 : This icon indicate device works Roaming status.
 :Your local inbox is full.
Quick Setup
Context
You can use Quick Setup to configure and maintain the settings of the Mobile WiFi.
Procedure
- Choose Settings > Quick Setup to access the quick setup wizard.
-
Follow the instructions to set parameters.
- Set profile parameters
- Set wireless local area network (WLAN) parameters
- Click Finish
Connection
To use the Mobile WiFi to access the Internet, you must create a network profile or set the default network profile and operator's network.
Creating a Network Profile
If you are using the Mobile WiFi for the first time, you must create a network profile to access the Internet.
Procedure
- Choose Settings > WAN > Profile Management
- Click New Profile.
- Set the profile-associated parameters.
Note:
- The value of Profile name can contain a maximum of 20 characters, including the following:
0–9, a-z, A-Z, blank space, and ! # $ ( ) * - . / = @ [ ] ^ _ { } ~ | , ; \ % + ? - Contact your service provider for detailed parameter settings.
- The value of Profile name can contain a maximum of 20 characters, including the following:
- Click Save.
Setting the Default Network Profile
After you set the default profile, the Mobile WiFi accesses the Internet via the default operator's network..
Procedure
- Choose Settings > WAN > Profile Management
- From the Profile name drop-down list, select a network profile.
- Click Apply.
Setting the Operator's Network
After configuring the settings, the Mobile WiFi can quickly find networks.
Selecting the Operator's Network Type
Select your operator's network type to find and log in to the network quickly.
Context
For details about your network type, contact your operator.
Procedure
- Choose Settings > WAN > Network Settings
- From the Preferred mode, select a mode.
- Click Apply.
Searching for and Registering with a Network
The Mobile WiFi supports both automatic and manual network registration.
Procedure
- Choose Settings > WAN > Network Settings
- From Mode, select a mode.
- Auto: The Mobile WiFi searches for an available network and registers with the network automatically.
- Manual: You need to search for an available network and register with it manually.
- Register with a network
- In Auto mode, click Apply
- In Manual mode, select one of the networks found and click OK.
Accessing the Internet Using the Cellular Data Network
Use the following method to connect the Mobile WiFi to the Internet.
Procedure
- Choose Settings > WAN > WAN Connection
- Click Automatic.
- Click Apply.
Note:
By default, Mobile WiFi connect to the Internet automatically. You can set Connection Mode is Manual, that means you have to connect to internet by click button on HOME page manually.
Connecting Clients to the Mobile WiFi over a WLAN
After WLAN is enabled on the Mobile WiFi, clients can connect to the Mobile WiFi and access the Internet using it.
Prerequisite
The Mobile WiFi is connected to the Internet.
Procedure
- Choose Settings > WLAN > WLAN Basic Settings.
- View the default value of SSID.
Note:
- You can change SSID to ensure the WLAN security. For details, see Changing the SSID. To further improve the WLAN security, you can set a security key for the WLAN. For details, see Setting the WLAN Key.
- To facilitate connections from clients, enable SSID Broadcast. For details, see Enabling or Disabling the SSID Broadcast.
- Enter SSID on clients.
After connecting to the Mobile WiFi, clients can access the Internet using the Mobile WiFi.
Viewing the Clients Connected
Check the number of clients connected to the Mobile WiFi and their details.
Procedure
- Click WLAN Clients.
- Under Connected WLAN clients , view the clients connected to the Mobile WiFi .
Adding a Client to the Blacklist
On the Mobile WiFi's web management page, you can add unwanted clients connected to the Mobile WiFi to the blacklist to better secure the Wi-Fi network.
Procedure
- Click WLAN Clients.
- Under Connected WLAN clients, check the information about clients connected to the Mobile WiFi.
- Find the client you want to add to the blacklist, and click Block to display the Confirm dialog box..
- Click OK.
Note:
- Under Blacklist, view all clients on the blacklist.
- To remove a client from the blacklist, click Delete under Blacklist.
Text Messaging
The Mobile WiFi allows you to create, send, view, import, and delete text messages.
Creating and Sending a Message
The Mobile WiFi allows you to create and send text messages.
Procedure
- Click SMS.
- Click New Message.
- Enter a recipient number.
Note:
The Mobile WiFi enables you to send a message to multiple recipients, whose numbers need to be separated by a semicolon (;).
- Enter the content of the text message.
- Click Send.
Viewing Messages
You can view received, sent, or draft messages.
Context
- Inbox: stores messages received.
- Outbox: stores messages already sent.
- Drafts: stores draft messages and messages that failed to be sent.
- :messages that have been read.
- :unread messages.
Procedure
- Click SMS.
- Click the message to view its content.
Note:
To reply to or forward a message, click the message, then Reply or Forward.
Importing Text Messages
You can import text messages from a SIM card to the Mobile WiFi .
Procedure
- Click SMS.
- Click Import.
Deleting Text Messages
This section describes how to delete text messages.
Procedure
- Click SMS.
- Find the message you want to view.
- Click the arrows in the lower right corner to turn pages.
- : Go to the first page.
- : Go to the previous page.
- : Go to the next page.
- : Go to the last page.
- To go to a specific page, enter the page number in the Page field, and click Go.
- Click the arrows in the lower right corner to turn pages.
- Mark the messages you want to delete, and click Delete.
Note:
You can unmark any marked message.
Configuring the SMS
Configure Short Message Service (SMS) settings.
Procedure
- Choose SMS > SMS Settings.
- Set SMS parameters.
- Set the SMS center number.
Note:
- The SMS center number is provided by the SIM/USIM/UIM card service provider. The number is updated automatically after a SIM/USIM/UIM card is inserted.
- If the number is left blank or deleted, contact the SIM/USIM/UIM card service provider.
- Turn on or off the SMS report function.
- Set the SMS center number.
- Click Apply to save the settings.
Phonebook
Creating new contact
The Mobile WiFi allows you to create new contact.
Procedure
- Click Phonebook->All Group.
- Click Add.
- Enter contact name, contact number.
- Click Save.
Edit the contact
The Mobile WiFi allows you to edit contact.
Procedure
- Click Phonebook->All Group.
- Select the contact you want to edit.
- Click
 icon on the right of the contact.
 - Enter the new contact name or number.
- Click Save.
Note:
You can edit the contact name, contact number, and change the group which the contact belong to.
Deleting Contact
The Mobile WiFi allows you to delete contact.
Procedure
- Click Phonebook->All Group.
- Select the contact you want to delete.
- Click Delete.
Note:
You can unmark any marked the contact.
Importing Contacts
You can import contacts from a SIM card to the Mobile WiFi
Procedure
- Click Phonebook->All Group.
- Click Import.
Move the Contacts to the Group
You can move the contacts to the group you want .
Procedure
- Click Phonebook->All Group.
- Select the contact you want to move.
- Click Move to Group.
- Select the group you want move into from the drop list.
- Click Move.
Send message
You can send message to some people you selected in phonebook.
Procedure
- Click Phonebook->All Group.
- Select the contact you want to send message.
- Click Send Message.
Note:
You can send message to one people with
 icon on the right of the contact.
Group Management
Creating new group
The Mobile WiFi allows you to create new group.
Procedure
- Click Phonebook->Group Management.
- Click Add.
- Enter group name.
- Click Save
Deleting the group
The Mobile WiFi allows you to delete group.
Procedure
- Click Phonebook->Group Management.
- Select the group you want to delete.
- Click Delete.
Note:
You can unmark any marked the group.
Editting the group
The Mobile WiFi allows you to edit group.
Procedure
- Click Phonebook->Group Management.
- Select the group you want to edit.
- Clickicon on the right of the group.
- Input the new group name.
- Click Save.
USSD
The Mobile WiFi supports USSD service.
Using the USSD Function
The Unstructured Supplementary Service Data (USSD) services are interactive data services. You can use an interactive data service supplied by the network operator after sending an USSD command from the Mobile WiFi .
Context
- USSD commands are supplied by the network operator.
- Contact your network operator for details about their USSD services charging scheme.
Procedure
- Choose USSD > USSD > Check Services .
- Enter the USSD command in the Enter a command or select a command from the drop-down list box. text box or select the corresponding command name.
- Click Send.
Update
This section describes how to update the Mobile WiFi application to its latest version.
Online Update
The Mobile WiFi provides the online update function.
Procedure
- Click Update to check the current version information.
Note:
- During your update, do not close the browser or unplug the Mobile WiFi.
- lick Check for updates. The Mobile WiFi will detect the latest version.
- Click Update Now. A Downloading… dialog is displayed, showing the download progress.
A Confirm dialog is displayed, indicating that the download succeeds. - Click OK.
Update Settings
You can set Auto update enable to make device update to latest version automatically.
- Click Settings > System > Update Settings.
- Select Enable.
- Click Apply.
PIN Management
PIN Management provides PIN security settings to prevent unauthorized use of the SIM, USIM.
Turning On or Off PIN Verification
If PIN verification is turned on, you need to enter the PIN only when the Mobile WiFi is turned on. If PIN verification is turned off, no PIN is required.
Context
- If a PIN is required, enter the correct PIN.
- If you enter your PIN incorrectly three times consecutively, the SIM/USIM/UIM card is locked and you must enter the PIN unlock key (PUK).
- If you enter the PUK incorrectly ten times consecutively, the SIM/USIM/UIM card is locked permanently. If you cannot enter the correct PIN or PUK, network-associated functions are unavailable.
- The PIN and the PUK are provided with the SIM/USIM/UIM card. If you did not receive them or have forgotten them, contact the operator.
Procedure
- Choose Settings > Security > PIN Management .
- From PIN operation, select:
- Enable: to turn on PIN verification.
- Disable: to turn off PIN verification.
- Enter the correct PIN.
- Click Apply.
Changing the PIN
If PIN verification is turned on, you can change the PIN.
Procedure
- Choose Settings > Security > PIN Management.
- From PIN operation, select Modify.
- Enter the current PIN.
- Enter a new PIN and confirm the PIN.
- Click Apply.
WLAN Settings
Setting the SSID of the WLAN
The service set identifier (SSID) is a name that identifies a wireless local area network (WLAN). A wireless client (for example, a computer) can communicate with the Mobile WiFi properly only when they are using the same SSID. To ensure the WLAN security, do not use the default SSID. You can define an SSID as required.
Changing the SSID
This section describes how to change the service set identifier (SSID).
Procedure
- Choose Settings > WLAN > WLAN Basic Settings .
- In SSID, enter the SSID.
- Click Apply.
Enabling or Disabling the SSID Broadcast
If the service set identifier (SSID) broadcast function is enabled, the Mobile WiFi broadcasts the SSID of the wireless local area network (WLAN) facilitating clients' access to the WLAN. The disadvantage is that unauthorized clients can also access the WLAN. If the SSID broadcast is disabled, the Mobile WiFi does not broadcast the SSID of the WLAN. So the SSID must be entered manually and correctly from a client before the client accesses the WLAN. This improves the security of the WLAN.
Procedure
- Choose Settings > WLAN > WLAN Basic Settings .
- Set SSID Broadcast.
- Enable: to enable the SSID broadcast.
- Disable: to disable the SSID broadcast.
- Click Apply.
Note:
During the process of setting up the WLAN, you can set the SSID broadcast to Enable to facilitate the access from clients. After the WLAN is set up, set the SSID broadcast to Disable to improve the security of the WLAN.
Setting the WLAN Key
To improve the security of the wireless local area network (WLAN), set a security key for the WLAN.
Procedure
- Choose Settings > WLAN > WLAN Basic Settings .
- Select Security mode.
- None(Open): No encryption. No security key is required when clients access the WLAN.
Note:
For daily use, it is recommended that you set a security key, to improve the security performance of a WLAN. - WEP: This stands for Wired Equivalent Privacy.
- WPA2-PSK: This is the second version of WPA-PSK and is more secure than WPA-PSK.
- WPA/WPA2-PSK: Both WPA-PSK and WPA2-PSK encryption modes are supported. Clients can access the WLAN in WPA-PSK or WPA2-PSK mode.
- None(Open): No encryption. No security key is required when clients access the WLAN.
- Enter a security key.
Note:
Select Show password to view the security key that you have entered. - Click Apply.
Setting a WPA Security Key for the WLAN
- From Security mode, select WPA2-PSK.
- In WPA pre-shared key, enter the security key. For example, 12345678.
- Click Apply.
Setting the Working Band
This section describes how to select a required work band.
Procedure
- Choose Settings > WLAN > WLAN Advanced Settings.
- From the Working band drop-down list, choose a work band.
- Click Apply
Setting Sleep Time
This section describes how to select Wi-Fi Sleep time. If no Wi-Fi user is connected within the set time, the Wi-Fi will go into Sleep.
Procedure
- Choose Settings > WLAN > WLAN Advanced Settings.
- From the Sleep Time drop-down list, choose a time value.
- Click Apply
Setting Tx Power
This section describes how to select Wi-Fi Tx power level.
Procedure
- Choose Settings > WLAN > WLAN Advanced Settings.
- From the Tx power drop-down list, choose a Tx power level.
- Click Apply
Setting Max User
This section describes how to set the Max Wi-Fi user allowed.
Procedure
- Choose Settings > WLAN > WLAN Advanced Settings.
- From the Max user drop-down list, choose the number the max Wi-Fi user allowed.
- Click Apply
Setting AP Isolation
If access point (AP) isolation is enabled, clients connected to the Mobile WiFi cannot communicate with each other. If AP isolation is disabled, clients connected to the Mobile WiFi can communicate with each other.
Procedure
- Choose Settings > WLAN > WLAN Advanced Settings.
- From AP isolation, select:
- On: to enable AP isolation.
- Off: to disable AP isolation.
- Click Apply
Setting WLAN MAC Filtering
You can control and manage the clients that access the wireless local area network (WLAN) to improve the security performance of the WLAN.
Procedure
- Choose Settings > WLAN > WLAN MAC Filter.
- From WLAN MAC Filter, select a Media Access Control (MAC) filtering mode.
- Disable: to disable the function of filtering MAC addresses.
- Allow: If the MAC address of a client is listed in MAC Address, the client is allowed to connect to the Mobile WiFi over the WLAN.
- Deny: If the MAC address of a client is listed in MAC Address, the client is prohibited from connecting to the Mobile WiFi over the WLAN.
- In MAC Address, enter the MAC addresses of the clients to be controlled.
- Click Apply
- Click WLAN Clients. From the MAC Address column under Connected WLAN clients, find the MAC addresses of clients whose access to the WLAN is allowed. For example, 40:4D:8E:6D:80:7D.
- Choose Settings > WLAN > WLAN MAC Filter. From WLAN MAC Filter, select Allow.
- In MAC Address, enter 40:4D:8E:6D:80:7D.
- Click Apply
Specifying the WLAN Bandwidth
The wireless local area network (WLAN) bandwidth is the transmission frequency bandwidth of the Mobile WiFi. A greater transmission frequency bandwidth indicates a faster data transmission speed and lower penetrability.
Procedure
- Choose Settings > WLAN > WLAN Advanced Settings.
- Select the desired WLAN bandwidth from the Wi-Fi bandwidth drop-down list box.
- 20M: This option indicates 20 MHz, corresponds to the bandwidth of 50 Mbit/s, and produces good penetrability and long transmission distance.
- 40M: This option indicates 20 MHz, corresponds to the bandwidth of 70 Mbit/s, and has better penetrability and longer transmission distance.
- Click Apply
WPS Settings
Wi-Fi Protected Setup (WPS) is a special way to connect WiFi, the AP and the client can automatically for security settings, you can simply press the button or enter the PIN.
Set the PIN code to verify the WPS access credentials
Procedure
- Choose Settings > WLAN > WPS Settings.
- Get the PIN value from the terminal first and input here.
- Click Apply
Start WPS with PBC
Procedure
- Choose Settings > WLAN > WPS Settings.
- Select PBC.
- Click Apply
DHCP Settings
Enabling the DHCP Server
If the Dynamic Host Configuration Protocol (DHCP) server is enabled, the Mobile WiFi allocates IP addresses to clients connected to it.
Context
- DHCP IP range and DHCP lease time (s) are available to be set only when the DHCP server is enabled.
- After the DHCP server is enabled, enable the function to automatically obtain an IP address and a DNS server address from clients.
Procedure
- Choose Settings > WLAN > DHCP.
- In IP address, enter the two last digits of the Mobile WiFi's IP address.
- Select Enable to enable the DHCP server.
- In DHCP IP range, enter the last digit of the start IP address and the end IP address.
- In DHCP lease time (s), enter a lease time.
- Click Apply.
Disabling the DHCP Server
If the Dynamic Host Configuration Protocol (DHCP) server is disabled, the Mobile WiFi does not allocate IP addresses to clients connected to it and IP addresses must be entered from each client.
Procedure
- Choose Settings > WLAN > DHCP.
- Select Disable to disable the DHCP server.
- Click Apply.
Configuring DHCP Clients
If the Dynamic Host Configuration Protocol (DHCP) server is enabled, certain settings must be configured on clients.
Context
The following describe how to configure DHCP settings on a computer running Windows 7 as an example.
Procedure
- Choose Start > Control Panel.
- From the Viewed by drop-down list, choose Category.
- Choose Network and Internet > Network and Sharing Center > Change adapter settings > Wireless Network Connection .
- Right click the network icon that you want to configure and choose Properties.
- On the Networking tab page, choose Internet Protocol Version 6 (TCP/IPv6) or Internet Protocol Version 4 (TCP/IPv4), and then click Properties.
- On the Internet Protocol 6 (TCP/IPv6) Properties dialog box, select Obtain an IPv6 address automatically and Obtain DNS server address automatically. Or on the Internet Protocol 4 (TCP/IPv4) Properties dialog box, select Obtain an IP address automatically and Obtain DNS server address automatically.
- Click OK.
Security Settings
Enabling or Disabling the Firewall
The Mobile WiFi supports the firewall function to control the transmission of data streams and protect your local area network from unauthorized access.
Procedure
- Choose Settings > Security > Firewall Switch.
- Select Enable firewall to enable the firewall or clear it to disable the firewall.
Note:
Other parameters are available only if you select Enable firewall. - Select Disable WAN port ping to disable the ping function.
- Click Apply.
WAN IP Filter
The function to filter IP addresses in the wireless local area network (WLAN), it can be used to restrict the user access to the specific internet services.
- Enable WAN IP Filter
- Choose Settings > Advance >WAN IP Filter.
- Select the check box on the left of Enable IP Filter.
- Input the IP addresses that you want to restrict, such as: 115.239.210.26
- Click APPLY button.
- Open a browser and enter the IP address that restricted (115.239.210.26) in the address bar. It should can not be opened.
- Disable WAN IP Filter
- Choose Settings >Security> WAN IP Filter.
- Remove the check box checked of Enable WAN IP Filter.
- Click APPLY button.
- Open a browser and enter the IP address (115.239.210.26) in the address bar. It should can be opened.
Note:
WAN IP Filter function goes into effect only for Wi-Fi users.
URL Filter
The function to filter URL in the wireless local area network (WLAN), it can be used to restrict the user access to the specific internet services.
Note:
Please input the domain that you want to filter, for example if you want to filter Google then you need to put www.google.com or google.com, other format URL cannot be filtered, like: http://www.google.com or https://www.google.com.
- Enable URL Filter
- Choose Settings > Security > URL Filter.
- Select the check box on the left of Enable URL Filter.
- Input the URL that you want to restrict. Such as:www.baidu.com .
- Click APPLY button.
- Open a browser and enter the URL that restricted (www.baidu.com) in the address bar. It should can not be opened.
- Disable URL Filter
- Choose Settings > Security-> URL Filter.
- Remove the check box checked of Enable URL Filter.
- Click APPLY button
- Open a browser and enter the URL you want to open in the address bar. It should can be opened
Note:
Please clear the file cache on your browser setting after click APPLY button as follow ways.
Note:
URL Filter function goes into effect only for Wi-Fi user.
Port Forward
It allows remote computers (for example, computers on the Internet) to connect to a specific computer or service within a private local-area network.
Procedure
- Choose Settings > Security Settings > Port Forward .
- Select the check box on the left of Enable Port Forward
- Select the user info from user list, that Host name and MAC address will add to port forwarding list, but you still have to input Config Name, Local and Wan port by manually. Or you can input all of info by manually.
Note:
Local port can be repeated, WAN port can’t be repeated - Click Apply button.
- Start the server on the device that added the port forwarding list.
Note:
The server include Web server, ftp server, Web camera server etc. - Access the device started server with the other terminal connected Internet through WAN IP address with WAN port to the device started server. Such as: http://183.42.114.82:8080.
- The server can be accessed successfully.
Configuring a Virtual Server
The Mobile WiFi supports the virtual server to enable external users to use the services provided in the local area network (LAN) using the Hypertext Transfer Protocol (HTTP), File Transfer Protocol (FTP), and other protocols.
Procedure
- Choose Settings > Security > Virtual Server .
- Click Add and set the parameters.
- Click OK to save the settings.
Note:
- Edit: to edit an item.
- Delete: to delete an item.
- Click Apply for the settings to take effect.
Setting the DMZ
If external users cannot access certain network services provided by the local area network (LAN), use the DMZ function provided by the Mobile WiFi to set the client that provides the required network services as the DMZ host; external users can then access these services properly. DMZ is an acronym for the demilitarized zone in networks.
Prerequisite
DMZ users are not protected by the firewall and may be easily attacked. In addition, the security of other users in the LAN is compromised.
Procedure
- Choose Settings > Security > DMZ Settings.
- Select:
- Enable: to enable the DMZ function.
- Disable: to disable the DMZ function.
- In DMZ IP address:, enter the IP address of the client to be set as the DMZ host
Note:
One client can be set as the DMZ host at a time. - Click Apply.
Setting the UPnP
The Universal Plug and Play (UPnP) service realizes intelligent connection between two UPnP devices using port forwarding. UPnP devices can obtain IP addresses automatically and access the Internet dynamically.
Procedure
- Choose Settings > Security > UPnP Settings .
- Select:
- Enable: to enable the UPnP service.
- Disable: to disable the UPnP service.
- Click Apply.
System Management
Viewing Mobile WiFi Information
This section describes how to view the information about the Mobile WiFi.
Procedure
- Choose Settings > System > Device Information .
- View Mobile WiFi information.
Changing the Password
To prevent unauthorized access to the management page, change the login password.
Procedure
- Choose Settings > System > Modify Password.
- Enter the current password.
- Enter a new password and confirm it.
Note:
The password can contain a maximum of 15 characters, including numbers, letters (upper or lower case), space, and the following symbols: ! # $ ( ) * - . / = @ [ ] ^ _ ` { } ~ | - Click Apply.
SD Card Setting
Set SD Card Password
To prevent unauthorized access to sd card, change the default password.
The default user name and password are both sdcard.
Procedure
- Choose Settings > System > SD Card Setting.
- Enter the current password.
- Enter a new password and confirm it.
- Click Apply.
Change SD Card Mode
To prevent unauthorized access to sd card, change the login password.
Procedure
- Choose Settings > System > SD Card Setting.
- Select the SD Card Mode From Storage mode drop list.
- Click Apply.
Restoring Default Settings
After you restore the Mobile WiFi to its default settings, your personal information will be deleted, and parameters will be restored to their default values.
Procedure
- Choose Settings > System > Restore Defaults .
- Click Restore.
Configuration Backup
You can Backup and Restore the all the setting parameters in the device.
Backup the parameters
Procedure
- Choose Settings > System > Configuration Backup.
- Click Backup.
Restore the parameters
Procedure
- Click Restore.
Note:
This function can not backup and Restore TR069 and Preferred Mode setting.
Rebooting the Mobile WiFi
This section describes how to reboot the Mobile WiFi.
Procedure
- Choose Settings > System > Reboot.
- Click Reboot.
SD Card
It allows the other wireless devices (such as mobile phone) can be connected to Mobile WiFi using Wi-Fi, and access to the SD card content. In order to make sure you enjoy this feature better, we recommend strongly you use it with Google Chrome, Fire fox, and Safari browser.
Note:
The device only supports FAT32 format, you can formatting you SD card to FAT32 if your SD card not match with it.
The file format SD Card supports
| File Items | Description |
|---|---|
| Document | ".doc"," .txt",".ppt",".xls',"pdf" |
| Image | ".jpg",".bmp",".png" |
| Audio | ".wav","mp3" |
| Video | ".avi",".mp4",".rmvb" |
| Package | ".rar",".zip" |
The function introduction on PC system Upload File
You can upload file to SD card from computer or mobile phone.
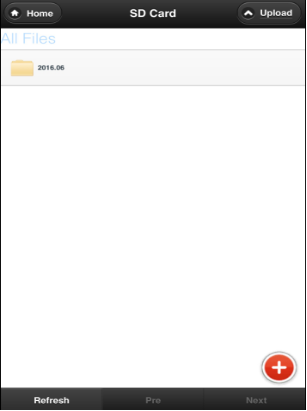
- Click SD Card on the Home page to enter SD Card page.
- Press the Upload button.
- Select the file you want to upload to SD card.
- Press the Start button on the pop up window to start uploading the file.
- You can find the file in the corresponding directory.
Note:
The file will be uploaded to the folder created automatically with named rule Year. Month in All Files directory if you are locating root directory or you are locating other directory now, such as: Document, Audio, Video, Image, or Package.
Download File
You can download file from SD card.
- Click SD Card on the Home page to enter SD Card page.
- Select the file you want to download.
- Press the down arrow on the right of the file selected to download it.
New Folder
To New a folder in SD card.
- Click SD Card on the Home page to enter SD Card page.
- Find New Folder button.
- Input the name of file, and move the mouse to other place.
- It will pop up to prompt "New Folder Success!".
Note:
The new folder created will locate in the folder created automatically with named rule Year. Month in All Files root directory if you are locating other directory currently to new a folder, such as: Document, Audio, Video, Image, or Package.
Search the file
You can find the file you want to get quickly with this feature.
- Click SD Card on the Home page to enter SD Card page.
- Find the search Icon on the right of New Folder button.
- Input the file name in the textbox.
- Press Enter Key on PC to get the file you wanted.
Note:
You can search the file with Fuzzy query rule. For example:
- Input the search condition in textbox with *.txt, then all .txt files will be displayed.
- Input the search condition in textbox with 1*23. To meet this combination rule records will be displayed.
Note:
* code indicates one or more characters, and it can be placed anywhere in search condition
- Input the search condition in textbox with 1?23. To meet this combination rule records will be displayed.
Note:
"?"code indicates one character, and it can be placed anywhere in search condition.
- Input the search condition in the textbox with keyword such as 1234, then all files that contain 1234 characters will be displayed.
Rename the File or Folder
To rename the file or folder you selected.
- Click SD Card on the Home page to enter SD Card page.
- Select the file or folder you want to rename.
- With the right key or go to the drop list on the right of file or folder to select Rename item to rename the file or folder.
Delete the File or Folder
To delete the file or folder you selected.
- Click SD Card on the Home page to enter SD Card page.
- Select the file or folder you want to delete.
- With the right key or go to the drop list on the right of file or folder to select Delete item to delete the file or folder.
Check the SD capacity status
To check your SD card capacity status currently.
- Click SD Card on the Home page to enter SD Card page.
- Click the System on the left button corner. It will pop up a window.
- It displays the SD System status including SD capacity and Free capacity.
Format SD Card
To format your SD card.
- Click SD Card on the Home page to enter SD Card page.
- Click the System on the left button corner. It will pop up a window.
- Click Format card button, it will pop up a Prompt window.
- Select "OK"to format SD card. Otherwise cancel the operation.
- It will prompt "Format success" if format SD card successfully.
Access the SD Card on IOS and Android system device
Note:Behavior depends upon the browser version used on IOS/Android.
- Connect the IOS/Android system device to the Mobile WiFi via WIFI.
- Input the http://192.168.8.1 in the browser address bar go to web management page with default user name and password both are admin.
- Click SD Card on the Home page to enter SD Card page.
- Click
 button on Home Page to display others directory.
The function introduction for SD Card on IOS and Android system device
Upload File
You can upload file to SD card from IOS and Android system device, and share the file to others user that connected to Mobile WiFi via Wi-Fi.
- Click SD Card icon on the Home page to enter SD Card page.
- Click "Upload" button on Home Page
- Select the file you want to upload to SD card.
- Press the Start button on the pop up window to start uploading the file.
- You can find the file in the corresponding directory.
Note:
- The file will be uploaded to the folder created automatically with named rule Year. Month in All Files directory if you are locating root directory or you are locating other directory now, such as: Document, Audio, Video, Image, or Package.
- IOS7 system have two upload button that are Upload and Upload(mov). Upload button only for uploading one picture file. Upload(mov) IOS7 for uploading Multiple Video or picture files.
Download File
You can download file from SD card.
Note:
Audio, video, document cannot be downloaded, only online play On IOS and Android system device. Follow steps is for downloading picture on IOS and Android system device.
- Click SD Card icon on the Home page to enter SD Card page.
- Select the file you want to download.
- Open it and Slide your finger to down.
- Press and hold your finger on the picture.
- Select "Save Image" on the pop up window to save picture.
New Folder
To New a folder in SD card.
- Click SD Card icon on the Home page to enter SD Card page.
- Click button on Home Page.
- Find
 button and click it.
 - Input the name of file, and Click OK button to finish it.
- It will pop up to prompt "New Folder Success!"
Note:
The new folder created will locate in the folder created automatically with named rule Year. Month in All Files root directory if you are locating other directory currently to new a folder, such as: Document, Audio, Video, Image, or Package.
Search the file
You can find the file you want to get quickly with this feature.
- Click SD Card icon on the Home page to enter SD Card page.
- Click button on Home Page.
- Find
 button and click it.
 - Input the file name in the textbox.
- Press Enter Key to get the file you wanted.
Note:You can search the file with Fuzzy query rule. For example:
- Input the search condition in textbox with *.txt, then all .txt files will be displayed.
- Input the search condition in textbox with 1*23. To meet this combination rule records will be displayed.
Note:
* code indicates one or more characters, and it can be placed anywhere in search condition. - Input the search condition in textbox with 1?23. To meet this combination rule records will be
Note:
"?"code indicates one character, and it can be placed anywhere in search condition.displayed. - Input the search condition in the textbox with keyword such as 1234, then all files that contain 1234 characters will be displayed.
Rename the File or Folder
To rename the file or folder you selected.
- Click SD Card icon on the Home page to enter SD Card page.
- Select the file or folder you want to rename.
- Slide your finger to the right.
- Input the new file name or folder name and press "Yes" button to finish it.
- It will pop up to prompt "Rename Success!"
Delete the File or Folder
To delete the file or folder you selected.
- Click SD Card icon on the Home page to enter SD Card page.
- Select the file or folder you want to delete.
- Slide your finger to the left.
- Press "Yes" button to delete the file or folder on the pop up window
Check the SD capacity status
To check your SD card capacity status currently.
- Click SD Card icon on the Home page to enter SD Card page.
- Click button on Home Page.
- Find
 button and click it.
 - It displays the SD System status including SD capacity and Free capacity on pop up window.
Format SD Card
To format your SD card.
- Click SD Card icon on the Home page to enter SD Card page.
- Click button on Home Page.
- Find button and click it.
- Click Format card button, it will pop up a Prompt window.
- Select "Yes"to format SD card. Otherwise cancel the operation.
- It will prompt "Format success" if format SD card successfully.
FAQs
Clients Cannot Access the Internet Properly
Procedure
- Check that clients are connected to the Mobile WiFi properly.
- Check that the Mobile WiFi is powered on properly.
- Check that the Mobile WiFi is in a location covered by communication networks and that the signal strength is strong.
- When the Mobile WiFi is used for Internet access, the Point-to-Point Protocol (PPP) user name and password must be set correctly. Check that the PPP user name and password are correct. For details, see Creating a Network Profile.
- If the Dynamic Host Configuration Protocol (DHCP) service is not enabled and the clients are set to obtain IP addresses dynamically, the clients cannot access the Internet. In this case, enable the DHCP service. For details, see DHCP Settings.
- Check that the network adapters of the clients are working properly.
- Contact your service provider if the problem persists.
Clients Cannot Access the WLAN Properly
Procedure
- Check whether there are potential interference sources or shielding objects near the MOBILE_ROUTER. If any, adjust the placement of the Mobile WiFi
- Check and record the settings of the following parameters on the clients and the Mobile WiFi: SSID, Encryption mode, and security key. The encryption mode and the security key on the clients must match those set on the Mobile WiFi. Otherwise, change the setting on the clients
- If the Media Access Control (MAC) address filtering in the wireless local area network (WLAN) is enabled on Mobile WiFi, check that the MAC addresses of the clients are not in the Black list. For details, see Setting WLAN MAC Filtering.
Login IP Address for the Management Page Is Forgotten
Procedure
- Restore the default settings.
- Enter the following default login IP address: 192.168.8.1.
Login username and password is forgotten
- Long press Reset button for 3 seconds to restore the default setting
- Enter the default username and password both are admin to login web management.
Wi-Fi Key Is Forgotten
- Log in to the management page and obtain the current Wi-Fi key. For details, see Setting the WLAN Key.
- Long press Reset button for 3 seconds to restore the default settings. Check the relevant label on the Mobile WiFi to obtain the default WI-Fi key.
Multi-Network IP Address Conflict Occurs
When multiple types of Internet connections are used simultaneously on the client, such as physical network adapter and Wi-Fi, inserting the Mobile WiFi into the client may result in IP address conflict across multiple networks.
Solution: Disable other network devices or disconnect other Internet connections from the client, and then restart Mobile WiFi.
Mobile WiFi's Data Services Are Blocked by Some Antivirus Software
Some antivirus software (for example, Bitdefender 2010) will block the Mobile WiFi's RNDIS port.
Solution: Upgrade the relevant antivirus software to its latest version. If the problem persists, disable the software's firewall.
What Can I Do If the Network Connection Is Frequently Interrupted?
Procedure
- Check the network signal strength. If the signal is weak, move the Mobile WiFi somewhere with better reception.
- Visit other websites to check whether the issue lies within a particular site.
- Close all other applications that require network connections.
- Contact your Internet service provider if the problem persists.
What Can I Do If I Cannot Open Web Pages After a Network Connection Is Set Up?
Procedure
- Re-set up a dial-up Internet connection.
- Check that the computer is not infected with viruses.
- Check that the APN user name and password in the profile management settings are correct. For details, contact your Internet service provider.
- Check that network connection has not been blocked by a firewall.
- Restart your computer, and re-set up a dial-up Internet connection.
What Can I Do If the Icons That Indicate No Signals and No Service Are Displayed?
Procedure
- Check that the Mobile WiFi is in an area with good reception. For details, contact your Internet service provider.
- Check that you have subscribed to network services for your USIM card, and that there is no outstanding balance. For details, contact your Internet service provider.
What Can I Do If the Network Access Rate Is Low?
Procedure
- Check that the Mobile WiFi is in an area with good reception. For details, contact your Internet service provider.
- Check the network standard used by the Mobile WiFi. The available network access rate varies by the network standard. For details, contact your Internet service provider.
Cannot login Web management Page
- Disconnect other network connections, such as an Ethernet or Wireless Fidelity (Wi-Fi) connection.
- Clear the cookies and caches of IE browsers.
- Close all IE browsers and Open again.
- Check the name and password of administrator is correct.
- Remove and then insert the Mobile WiFi, or restart the computer.
Acronyms and Abbreviations
| APN | access point name |
| DHCP | Dynamic Host Configuration Protocol |
| DMZ | demilitarized zone in networks |
| DNS | Domain Name Server |
| HSPA | High Speed Packet Access |
| IMEI | international mobile equipment identity |
| IMSI | international mobile subscriber identity |
| IP | Internet Protocol |
| LTE | Long Term Evolution |
| MAC | Media Access Control |
| PIN | personal identification number |
| PUK | PIN Unlock Key |
| SIM | subscriber identity module |
| SSID | service set identifier |
| UPnP | Universal Plug and Play |
| USSD | Unstructured Supplementary Services Data |
| WAN | wide area network |
| WCDMA | Wideband Code Division Multiple Access |
| WLAN | wireless local area network |
| Wi-Fi | Wireless Fidelity |